Cake Decorating Starter Kit: Piping Tips + Tools
Article
2026-01-22 • 6 min read

Cake Decorating Starter Kit: Piping Tips + Tools

Cake Decorating Starter Kit: Piping Tips + Tools. A cake decorating starter kit that focuses on piping tips and essential tools can be the gateway to turning simple baked goods into impressive creations. For beginners and hobbyists, a well chosen kit provides the confidence and structure needed to practice fundamentals before investing in high end equipment.

A cake decorating starter kit that focuses on piping tips and essential tools can be the gateway to turning simple baked goods into impressive creations. For beginners and hobbyists, a well chosen kit provides the confidence and structure needed to practice fundamentals before investing in high end equipment. The right combination of tips, bags, and basic tools can unlock a surprising range of textures and designs, from delicate rosettes to crisp borders, without overwhelming you with options. In this article we’ll explore what makes a solid starter kit, compare top brands and vendors, and offer practical guidance on choosing and using the kit that fits your goals.

What’s typically included in a starter kit

A good starter kit centers on a core assortment of piping tips, along with sturdy bags and practical accessories. Expect to find:

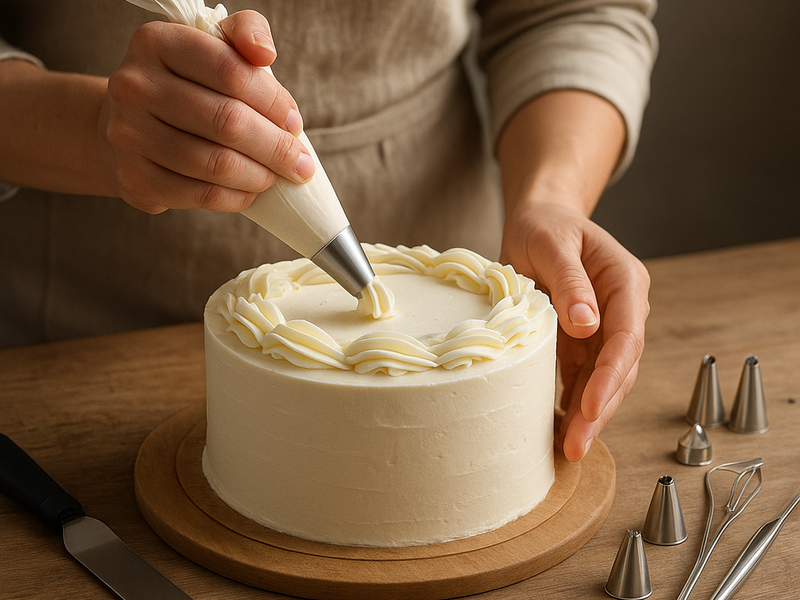
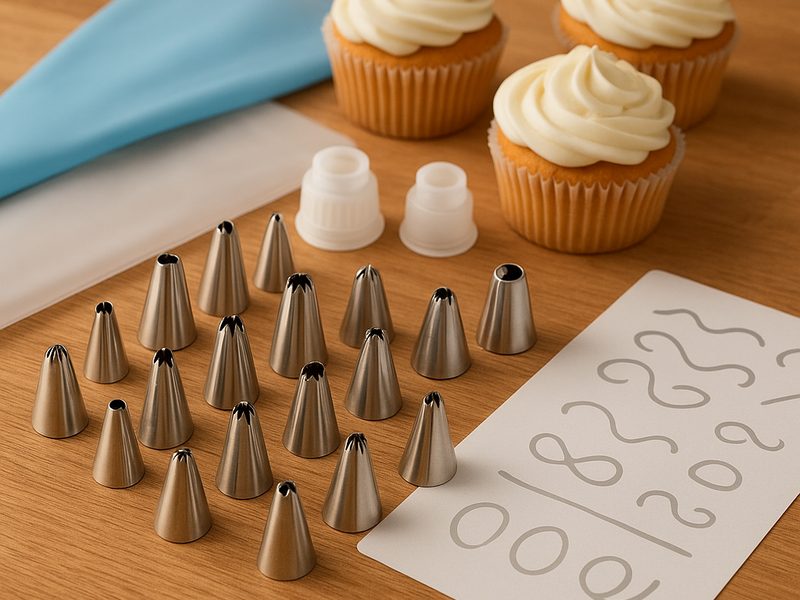
- Piping tips in a few core families: rounds for writing and beads, stars for swirls, florals and borders, petals and leaves for nature inspired decorations. The shapes you’ll use most early on are round, star, and leaf tips. - A selection of piping bags, usually a mix of disposable plastic bags and reusable silicone bags, to give you feel for different textures and cleanup approaches. - Couplers and adapters to interchange tips without reloading icing into the bag, which speeds up the process when practicing multiple designs. - A basic pair of scissors or snips, a small set of practice parchment sheets, and a simple tip organizer or case to keep tips clean and unscuffed.

Beyond the basics you’ll see varied extras depending on price and brand. Some kits include silicone mats for practicing borders, a recipe booklet for icing consistency, a silicone spatula, or a portable bag stand for easy filling. The number of tips can range from a modest handful to a couple dozen, but for beginners the emphasis should be on quality shapes rather than the sheer quantity.

Quality matters: steel versus aluminum and how to care for tips

A common decision point is whether to choose stainless steel tips or aluminum. Stainless steel tips tend to be durable, dishwasher safe, and resilient to frequent use. They resist bending and corrosion and hold their edge during piping. Aluminum tips are lighter and affordable but can ding or wear down over time with heavy use. For a starter kit you’ll often find a mix of both, with stainless steel favored for the long term. Keep in mind that copper or nonstick coatings are less common at the starter level and not always necessary for beginners.

Cleaning and care are worth a few minutes of your time. Rinse tips promptly after use, especially with colorful dyes that can stain or linger. If the icing dries inside the tip, soak briefly in warm water or a mild soap solution, then rinse and dry completely before storage. A dedicated tip case or small tray helps prevent loss or misplacement of shapes and keeps tips from rubbing against each other.

Where to shop and how to compare

Cake Decorating Starter Kit: Piping Tips + Tools

Top brands and retailers offer reliable starter kits, each with its own strengths:

- Wilton: A household name in cake decorating, Wilton kits are designed with beginners in mind. They typically include a clear mix of basic tips, practice materials, and an organizer. Availability is broad through their own site, in craft stores, and via major retailers. If you want guided projects and a gentle progression from basics to more complex borders, Wilton is a solid starting place. - Ateco: Known for professional grade equipment, Ateco tips are robust and widely used by bakers who demand longevity. Their starter options tend to skew toward a professional feel, but their durability makes them worth considering if you plan to invest for the long term. They pair well with sturdy bags and high quality couplers. - Kootek and Ohuhu type sets: These brands specialize in budget friendly, comprehensive kits that bundle several dozen tips with bags, adapters, and sometimes a portable case. They’re especially popular with beginners who want a lot of shapes and a low entry price. Expect good value, with the caveat that some components may be lighter weight and require occasional replacement. - Major retailers: Amazon, Michaels, Jo Ann, and other large craft stores carry multiple brands and often have frequent discounts or coupons. Shopping in person can help you feel the handle of bags and the balance of tips; online shopping offers convenience and a broad comparison of contents.

How to choose a starter kit for your goals

- Start with a plan: If you’re most excited about borders and rosettes, ensure your kit includes a reliable selection of star and round tips, plus a rosette-friendly arrangement. If you want floral designs, look for leaf and petal tips as part of the starter set. - Consider the basics first: A kit with several basic shapes, a couple of larger tips for quick borders, and a small but sturdy set of bags and a coupler is enough to begin. - Check the quality of bags and tips: Stainless steel tips with a solid finish and reinforced rims feel better to use and last longer. Silicone bags can be easier to squeeze for beginners but may wear faster with heavy icing. - Look for a storage solution: A dedicated tray or case helps you keep tips in order and reduces frustration as you practice. - Assess future needs: If you eventually plan more complex decorations, consider a kit that can be expanded with additional tip sets or a larger case rather than replacing the entire kit.

Getting started: practical steps and tips

- Unpack and organize: Separate tips by type, keep them in their case or labeled bag, and keep needed accessories within arm’s reach. - Set up your piping: Attach the tip to a coupler, insert into a bag, and fit a small amount of icing to check flow. Practice a few simple lines and dots on parchment before moving to a cake. - Practice basics first: Shell borders, simple rosettes, beads, and stars are excellent starting motifs. Once comfortable, try making a small flower using a leaf tip for contrast. - Build a routine: Practice a short routine daily or a few times a week. Consistency beats intensity, especially when you’re learning to control frosting pressure and tip angle. - Clean and store well: Clean tips, rinse bags, and dry before putting everything back in its case. A tidy kit speeds up learning and saves frustration.

Common questions often surface as you begin

- Is a kit with many tips better than a smaller starter set? More isn’t always better for a beginner. Focus on a few versatile shapes and ensure you can upgrade gradually. - Should I buy a kit with a case? Yes for organization and protection, especially if you plan to travel with your decorating supplies or keep a dedicated workspace. - How do I practice evenly with different tips? Keep a consistent icing consistency, maintain steady hand pressure, and practice on parchment until you feel confident before decorating a cake.

With the right starter kit in hand, you can begin a rewarding journey of cake decoration that’s both enjoyable and accessible. The goal is to build a solid foundation—practicing basic shapes, learning how tip shapes translate into texture, and developing a light, confident touch. As your skills grow, you’ll naturally seek out additional tips and accessories that expand your repertoire. Whether you choose a budget friendly set or a professional grade option, the essential steps remain the same: practice, patience, and a willingness to learn.

← Back to all articles